You will need to go to my daughter's blog, she didn't share the pictures, LOL, www.sassyscrapper.blogspot.com and check out the portion of her blog with the new PUNCH RACK we have. A really awesome addition that holds so many of our punches and I must say I designed it,(nothing that it would take a rocket scientist to build) : )) just really handy.
Our Studio, as we like to call it, is upstairs in the bonus room, so we call it the Stairway to Heaven.. ; ) Such a wonderful, peaceful room just packed full of all kinds of scrappin' goodies.
I hope you take a peek as it may be just the thing you're looking for to hold all your punches too!
Well, I'm off to do a little scrappin', so until next time, take care and God Bless.
Hugs
Joanie

Wednesday, May 30, 2012
Sunday, May 27, 2012
Colors of My Flag - Celebration of Memorial Day
Here is my creation for the Crafty Pad Challenge
The Colors of My Flag;
In Celebration of Memorial Day
The Colors of My Flag;
In Celebration of Memorial Day
I have made my creation using the colors of my flag and also used a patriotic theme to celebrate Memorial Day. If you have looked at my blog earlier in the week, you will see a similar card, but this one was re-created as I had to change it because as a DT for Crafty Pad I was to use a Crafty Pad image and oh, well, got carried away with the love of my country and used the beautiful eagle. So now, here is my re-creation of my card using the Teddy Bear with a Heart.
(There is a little story also attached to this posting for a little educational addition.)

I hope you like Teddy as I think he is a cutie and he goes well with the theme he can be purchased at the Crafty Pad store and oh, there is so many others. Check the store and get yours to make your creation for the challenge.
So let's see if my blogger and scrappin' friends can get a creation done and entered in the Crafty Pad Challenge this week to win a fantastic prize. Hope to see you there!!
Our fabulous sponsor this week is:
with a fantastic prize of
a £10 voucher to spend in their online store!
I know many of you in the USA know this story, perhaps some of our youngsters would like to read this or have it read to them, however, bloggers from other countries many find this reading interesting.
I hope you have enjoyed my creation as well as the story and if so, please leave some love.
If you're from another country I would love to see your flag, so leave me a comment telling me the name of your country and I will search to see the flag you're proud of.
So until next time,
Take care and God Bless
Hugs,
Joanie
If you're from another country I would love to see your flag, so leave me a comment telling me the name of your country and I will search to see the flag you're proud of.
So until next time,
Take care and God Bless
Hugs,
Joanie
Friday, May 25, 2012
God Bless the USA - Our Country Flag
Good Morning Blogger friends!! Glad you came by to take a peek.
I wanted to make a creation in honor of
Memorial Day.
I wanted to make a creation in honor of
Memorial Day.
Memorial Day, originally called Decoration Day, is a day of remembrance for
those who have died in our nation's service
Here is my creation showing the colors of the Flag of My Country, the U.S.A. and it's one of the most beautiful flags with all the stars and stripes.
Here is my creation showing the colors of the Flag of My Country, the U.S.A. and it's one of the most beautiful flags with all the stars and stripes.

Freedom's
Colors
©2002 Roger W Hancock (www.PoetPatriot.com)
©2002 Roger W Hancock (www.PoetPatriot.com)
Red is for Bravery;
blood shed in sacrifice.
Freedom came with lives the price.
White is for Liberty;
freedom's purity,
Life be free from God's decree.
Blue is for Justice;
as vast as the sky
Over freedom's land to occupy.

GOD BLESS OUR TROOPS
Thanks so much for stopping by and if this is your country's flag please leave a comment, if not, please tell me the name of your country so I can see the flag you are proud of.
So until next time,
Take care and God Bless
Hugs
Joanie
xxxx
Thursday, May 24, 2012
THE BIG DAY HAS ARRIVED!!!!!
The day has finally arrived for our
Link Up For Pink - Challenge #2.
The new design team has some great cards posted for inspiration,
so it's time to get your crafty stuff out and get started to participate in the
challenge for such a worthy cause.
This challenge will run from May 24
until June 7th.
There are fabby prizes to be won.
Our Sponsor for this Challenge is
The prize: a $12 voucher to A
Day for Daisies store.
A random winner will be announced on Friday, 6/8.

A random winner will be announced on Friday, 6/8.

So without further ado, here is my creation.

I hope you visit LINK UP FOR PINK and look around and read about how it was started, and how it grew to such an enormous blog and was also the first to be recognized by the
Amerian Cancer Society.
You can also follow on Facebook.
And just a reminder for all who visit my blog and to all my friends

So until next time,
Take care and God Bless.
Hugs,
Joanie xxxx
Friday, May 18, 2012
Here is some wonderful, great, awesome news!!!
I have been accepted as a DESIGN TEAM MEMBER for "LINK UP FOR PINK".
I am so excited, but most of all so "HONORED" to be chosen as a DT member for LUFP for such a fantastic cause.
I am asking all my scrappy friends and visitors to my blog to please participate in the challenges and to mark October 1st through the 14th for the biggest blog hop ever for BREAST CANCER AWARENESS.

Our second challenge will start on Thursday, 5/24 @ 10am PST and will end Thursday, 6/7, midnight PST.
Winners will be announced Friday, 6/8
Create ANY BCA Project.
I am so excited, but most of all so "HONORED" to be chosen as a DT member for LUFP for such a fantastic cause.
I am asking all my scrappy friends and visitors to my blog to please participate in the challenges and to mark October 1st through the 14th for the biggest blog hop ever for BREAST CANCER AWARENESS.
Our second challenge will start on Thursday, 5/24 @ 10am PST and will end Thursday, 6/7, midnight PST.
Winners will be announced Friday, 6/8
Create ANY BCA Project.
Until next time,
Take care and God Bless
Hugs xxx
Joanie
Joanie
Tuesday, May 15, 2012
TCP Showcase
Good Morning,
Today is The Crafty Pad Showcase day and I used one of the cutest image from the shop, a little rocking horse. Check it out.

I wanted a little change this time so I did a baby card. Thanks for stopping by and taking a peep.
Until next time,
Take care and God Bless
Hugs,
Joanie

I wanted a little change this time so I did a baby card. Thanks for stopping by and taking a peep.
Until next time,
Take care and God Bless
Hugs,
Joanie
Sunday, May 13, 2012
Challenge #170 Doodle It
Hello again, my Scrappin' friends. This challenge at The Crafty Pad was to Doodle something on your card, so I doodled my stitching around my card. I had a Tim Holtz die I got a few weeks ago and was just waiting to get my mojo in gear to use it. Well, Crafty Pad had the perfect images, the sewing machine and the dress form images so I really had a great time getting this creation all together.


Our fabulous sponsor this week with a super duper prize is the every so lovely folks from MeiFlower!

with a £20 voucher to spend in their online store!
It's time to get your creation posted and win some of the fabby prizes given away here.
Good Luck!!!
I am posting my creation on the following challenges also:
Link Up For Pink - Breast Cancer Awareness - Post your creations year round, but check out the site for the Annual LUFP Blog Hop!!
Inspire Me Fridays - Always Anything Goes
Stampin' For the Weekend - 4 or more layers
Crafts and Me - Challenge #83
Just Keep on Crafting Challenge #2
Colour Me Creative Copic's - Challenge #43 Anything Goes
Crafty Emma - Challenge #85 Anything Goes
Robyn's Fetish - Paper Piecing
The Squirrel and the Fox- Challenge One for the Girls
Art with no Boundaries - Anything Goes
Daring Cardmakers: Fussy Cuts -
Karens Doodles #104 - Something for Mom
Tuesday Throwdown #97: Motherly Love
Until next time,
Take card and God Bless
Hugs,
Joanie xxxx
Thursday, May 10, 2012
A little note to all my Scrappin' Buds
I meant to post my card first and then the tutorial. I was asked to do a tutorial so decided to do both and post both at the same time, right? Well, when I set the posting time I posted the Tutorial first. Hey, I do things like that most of the time.... like cart before the horse or back asswards, whatever...lol Anyway, my friends, just take a peak down below, way down below, and give me a little love to keep me on the move.
I hope you enjoyed my little Hedgehog and the tutorial looks long and hard but it's not, so give it a try with your favorite image. Makes a great card for Mother's Day.
Until next time,
Take care and God Bless
Joanie xxxx
I hope you enjoyed my little Hedgehog and the tutorial looks long and hard but it's not, so give it a try with your favorite image. Makes a great card for Mother's Day.
Until next time,
Take care and God Bless
Joanie xxxx
Tuesday, May 8, 2012
Easel Spinner Tutorial for Hedgehog Card
Spinner Easel
Tutorial Materials Needed
1 piece of Colored Cardstock 5”x10” for Card Base
1 piece of Colored Cardstock 5”x 5 ½” for Card Base (Same color as above piece)
1 piece of Colored Cardstock 5”x5” for Inside of Card
1 piece of Matching Pattern Paper 5”x 5”for Inside of Card
1 piece of Colored Cardstock 2” x 4” for Sentiment inside of
Card
1 piece Colored Cardstock 5”x 5” for matting on front of card
1 piece of Matching Pattern Paper 5” x 5” for front of card
2 pieces Colored cardstock for Spinner (This will be made out of scraps later)
1 piece Pattern Paper for Spinner (This will be made ot of scraps later)
1 piece of nylon (fishing line) cord 5 inches long
1 image of Hedgehog sized to 2 ¾ inches horizontally, colored and fussy cut the image.
Small tag and flowers for embellishments on card bottom to
use as card stop.
Bow, rhinestones for embellishing.
Cardstock for card base measurements.


Layer one 5” piece of cardstock and one 5” piece of pattern paper on top of 10” cardstock being used for card base. This will be the front of your card. Be sure you have three thicknesses of paper layered evenly on three sides with 5 inches of the cardstock being used for the card extending out on one end which will be the back of the card when finished.

Save the scalloped pieces for use later.

Cut two 3" inch circles out of cardstock and cut one 3 inch circles out of the 3 ½” scalloped piece. If you cut all three at once it is easier.

Use the two 3 inch
circles of cardstock, pattern paper and your Hedgehog cut out in this step.
Stamp a sentiment on one circle. Turn this circle over and put a piece of
score tape down the center of the circle (the diameter) and adhere the cord (nylon fishing line) down the center leaving an equal amount overhanging on each end. Adhere the second circle of cardstock to the cardstock with cord being sure the cord is well glued and the paper is even on
all edges. Adhere the patterned paper on
cardstock circle and place the Hedgehog image in the center of the Pattern paper.
***** Be sure the
cord is exactly in the middle/center of the circle. When this step is
completed, the image should be straight vertically if you hold the cord on each
end.


If you look closely in the center where I have a mark you will see the cord.

Of course I didn't notice I had mine upside down when I posted it on here :))
Cardbase Instructions
Use Score Tape on ½” flap and attach to edge of cardbase at
opposite end from cut out, adhering flap to inside.

Front of card:
Take one piece of the colored cardstock with cutout and trim
1/16th inch off each side.
This will allow the cardstock being used for the card to show as a mat.
Take the Pattern paper with cutout and trim 1/8th
inch off each side. This will allow the second
piece of cardstock to show as a mat.
Adhere the patterned paper to cardstock leaving an equal
amount of cardstock showing on all edges as a mat.

Using Score Tape, place a piece of the tape on the back of the cardstock exactly in the center on the top and the bottom of the cut out.
Place your circle with the image in the scalloped opening and Be sure everything is centered so the circle with the image will turn and not touch anything. Adhere the cardstock and pattern paper to the card front cardstock being sure the cord is firmly attached and pull both ends of the cord to tighten. Cut off excess cord.
Place your circle with the image in the scalloped opening and Be sure everything is centered so the circle with the image will turn and not touch anything. Adhere the cardstock and pattern paper to the card front cardstock being sure the cord is firmly attached and pull both ends of the cord to tighten. Cut off excess cord.
Put adhesive on colored cardstock and glue to back of card on inside to embellish.
Put adhesive on Pattern paper and glue to inside bottom
section and place the 2" by 4" piece of cardstock with a sentiment if desired.
Adhere flowers and tag on front edge of bottom section.
Put ribbon on top front of card.
Put rhinestones in flower centers.
You can now stand your easel card up resting the front against the flowers, tag, etc., and your image should turn and not touch the scalloped opening.
This is the card the original card I had made .

If you have any questions, please feel free to contact me at The Crafty Pad.
Happy Scrappin'
Hugs,
Joanie
You can now stand your easel card up resting the front against the flowers, tag, etc., and your image should turn and not touch the scalloped opening.
This is the card the original card I had made .


If you have any questions, please feel free to contact me at The Crafty Pad.
Happy Scrappin'
Hugs,
Joanie
New post, new releases, new ideas.....WOW
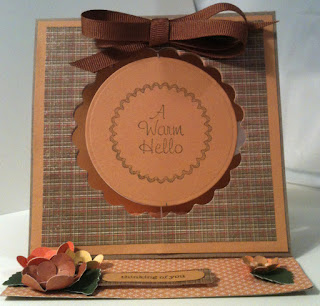
Hi My Scrappin' Peeps, hope all of you are doing well. I am here again to show you my new creation which is a Spinner Easel Card made with one of the many new images from The Crafty Pad. You really need to get on over to the store and check out some of the cutest digis, cut files, printable papers and so much more they have to offer.
Okay, enough rambling on, let me get my creation posted so you can send me some "Love", which I always need to keep the "mojo on the go".
This is the front with one side of the Spinner that says "A Warm Hello" that can be used for many types of cards.


And finally a sort of top view so you can see the flowers and the sentiment that says "Thinking of You" on the small tag.

This card can be used for so many different occasions just by changing the sentiment. I think this Hedgehog is the cutest, he would bring a smile to anyone's face.
Other challenges I am entering this card in are:
Forever Friends - must include an animal - (May) Spring
Sisterhood ofCrafters - May flowers
The Perfect Sentiment - must have sentiment on front - Get well without saying "get well"
Craft Your Days Away - #45 All Creatures Great and Small
Well, I hoped you enjoyed peeping in here and hope you come back often.
Until then, take care and God Bless.
Hugs
Joanie
Okay, enough rambling on, let me get my creation posted so you can send me some "Love", which I always need to keep the "mojo on the go".
This is the front with one side of the Spinner that says "A Warm Hello" that can be used for many types of cards.

This is another view showing the front again, but with the cutest little Hedgehog peeping at you on the other side of the Spinner.


This card can be used for so many different occasions just by changing the sentiment. I think this Hedgehog is the cutest, he would bring a smile to anyone's face.
There is a party at
The Crafty Pad this week!
Over the coming four days (Monday, Tuesday, Wednesday & Thursday) we are releasing FOUR adorable new images! We are also giving all our lovely followers a chance to WIN one of these 4 images and or the entire set! Wow HOW COOL is that??? Read on to find out all the deets!
We have some really too cute critters in this release. The DT have all fallen in love with these gorgeous little guys and I am sure you are all going to fall in love too :)
Today we would like you all to meet the latest little critters to join the
Well, for your chance to win this image and the entire 4 new images in this set all you have to do is .... Leave a comment on today's post and your name will go into the draw! It is that easy!
For another chance of winning, become a follower of The Crafty Pad Challenge Blog and leave us another comment saying you are a follower (new / old / and or existing) and get a 2nd chance into the draw.
For a 3rd chance in the draw - comment on ALL 4 of the release days (today Monday, Tuesday, Wednesday & Thursday) and go into a separate draw to win the complete set of 4 images!
*note* you can have 3 chances with each daily release!
Just leave us a comment each day and each day leave us another comment telling us you are a follower.
On Thursday (the last day) call back on each release day and leave us another comment saying you have commented on each day, and there you go, 3 chances each day into the draw and 12 chances in the draw to win the set! That is some great odds of winning these fabby little fellows!
Comments will close at 12pm GMT on Monday the 14th of May (so you have just over a week to play along). The winners will be drawn and announced on Thursday the 10th of May :)
Other challenges I am entering this card in are:
Inspire Me Fridays – Always
Anything Goes
Stampin'For The Weekend - 2W, 1E - Week 2, 4 or more Layers
Do You Stack Up? -Forever Friends - must include an animal - (May) Spring
Crafts and Me
- #83 punches and diecuts
CraftyCreations - #169 frame
Just Keep on Creating
-#2 anything goes Sisterhood ofCrafters - May flowers
The Perfect Sentiment - must have sentiment on front - Get well without saying "get well"
Craft Your Days Away - #45 All Creatures Great and Small
Well, I hoped you enjoyed peeping in here and hope you come back often.
Until then, take care and God Bless.
Hugs
Joanie
Subscribe to:
Posts (Atom)